


Integration of the ChirpStack R1X gateway with the SenseCAP S2101 sensor
Introduction
This guide walks you through the step-by-step process of setting up a complete LoRaWAN gateway solution. using ChirpStack on the Seeed reComputer R11 , an Edge controller based on Raspberry Pi. Thanks to the WM1302 LoRa hub module, the R1X becomes a powerful and reliable gateway. capable of providing long-range communication.
By configuring the Semtech Packet Forwarder , LoRa data is transmitted uninterrupted to ChirpStack. which manages the network and application layers. Using Docker simplifies service deployment. and ensures a modular and scalable environment. Finally, integration with MQTT enables an IoT data stream secure and real-time, from sensors such as the SenseCAP S2101 .
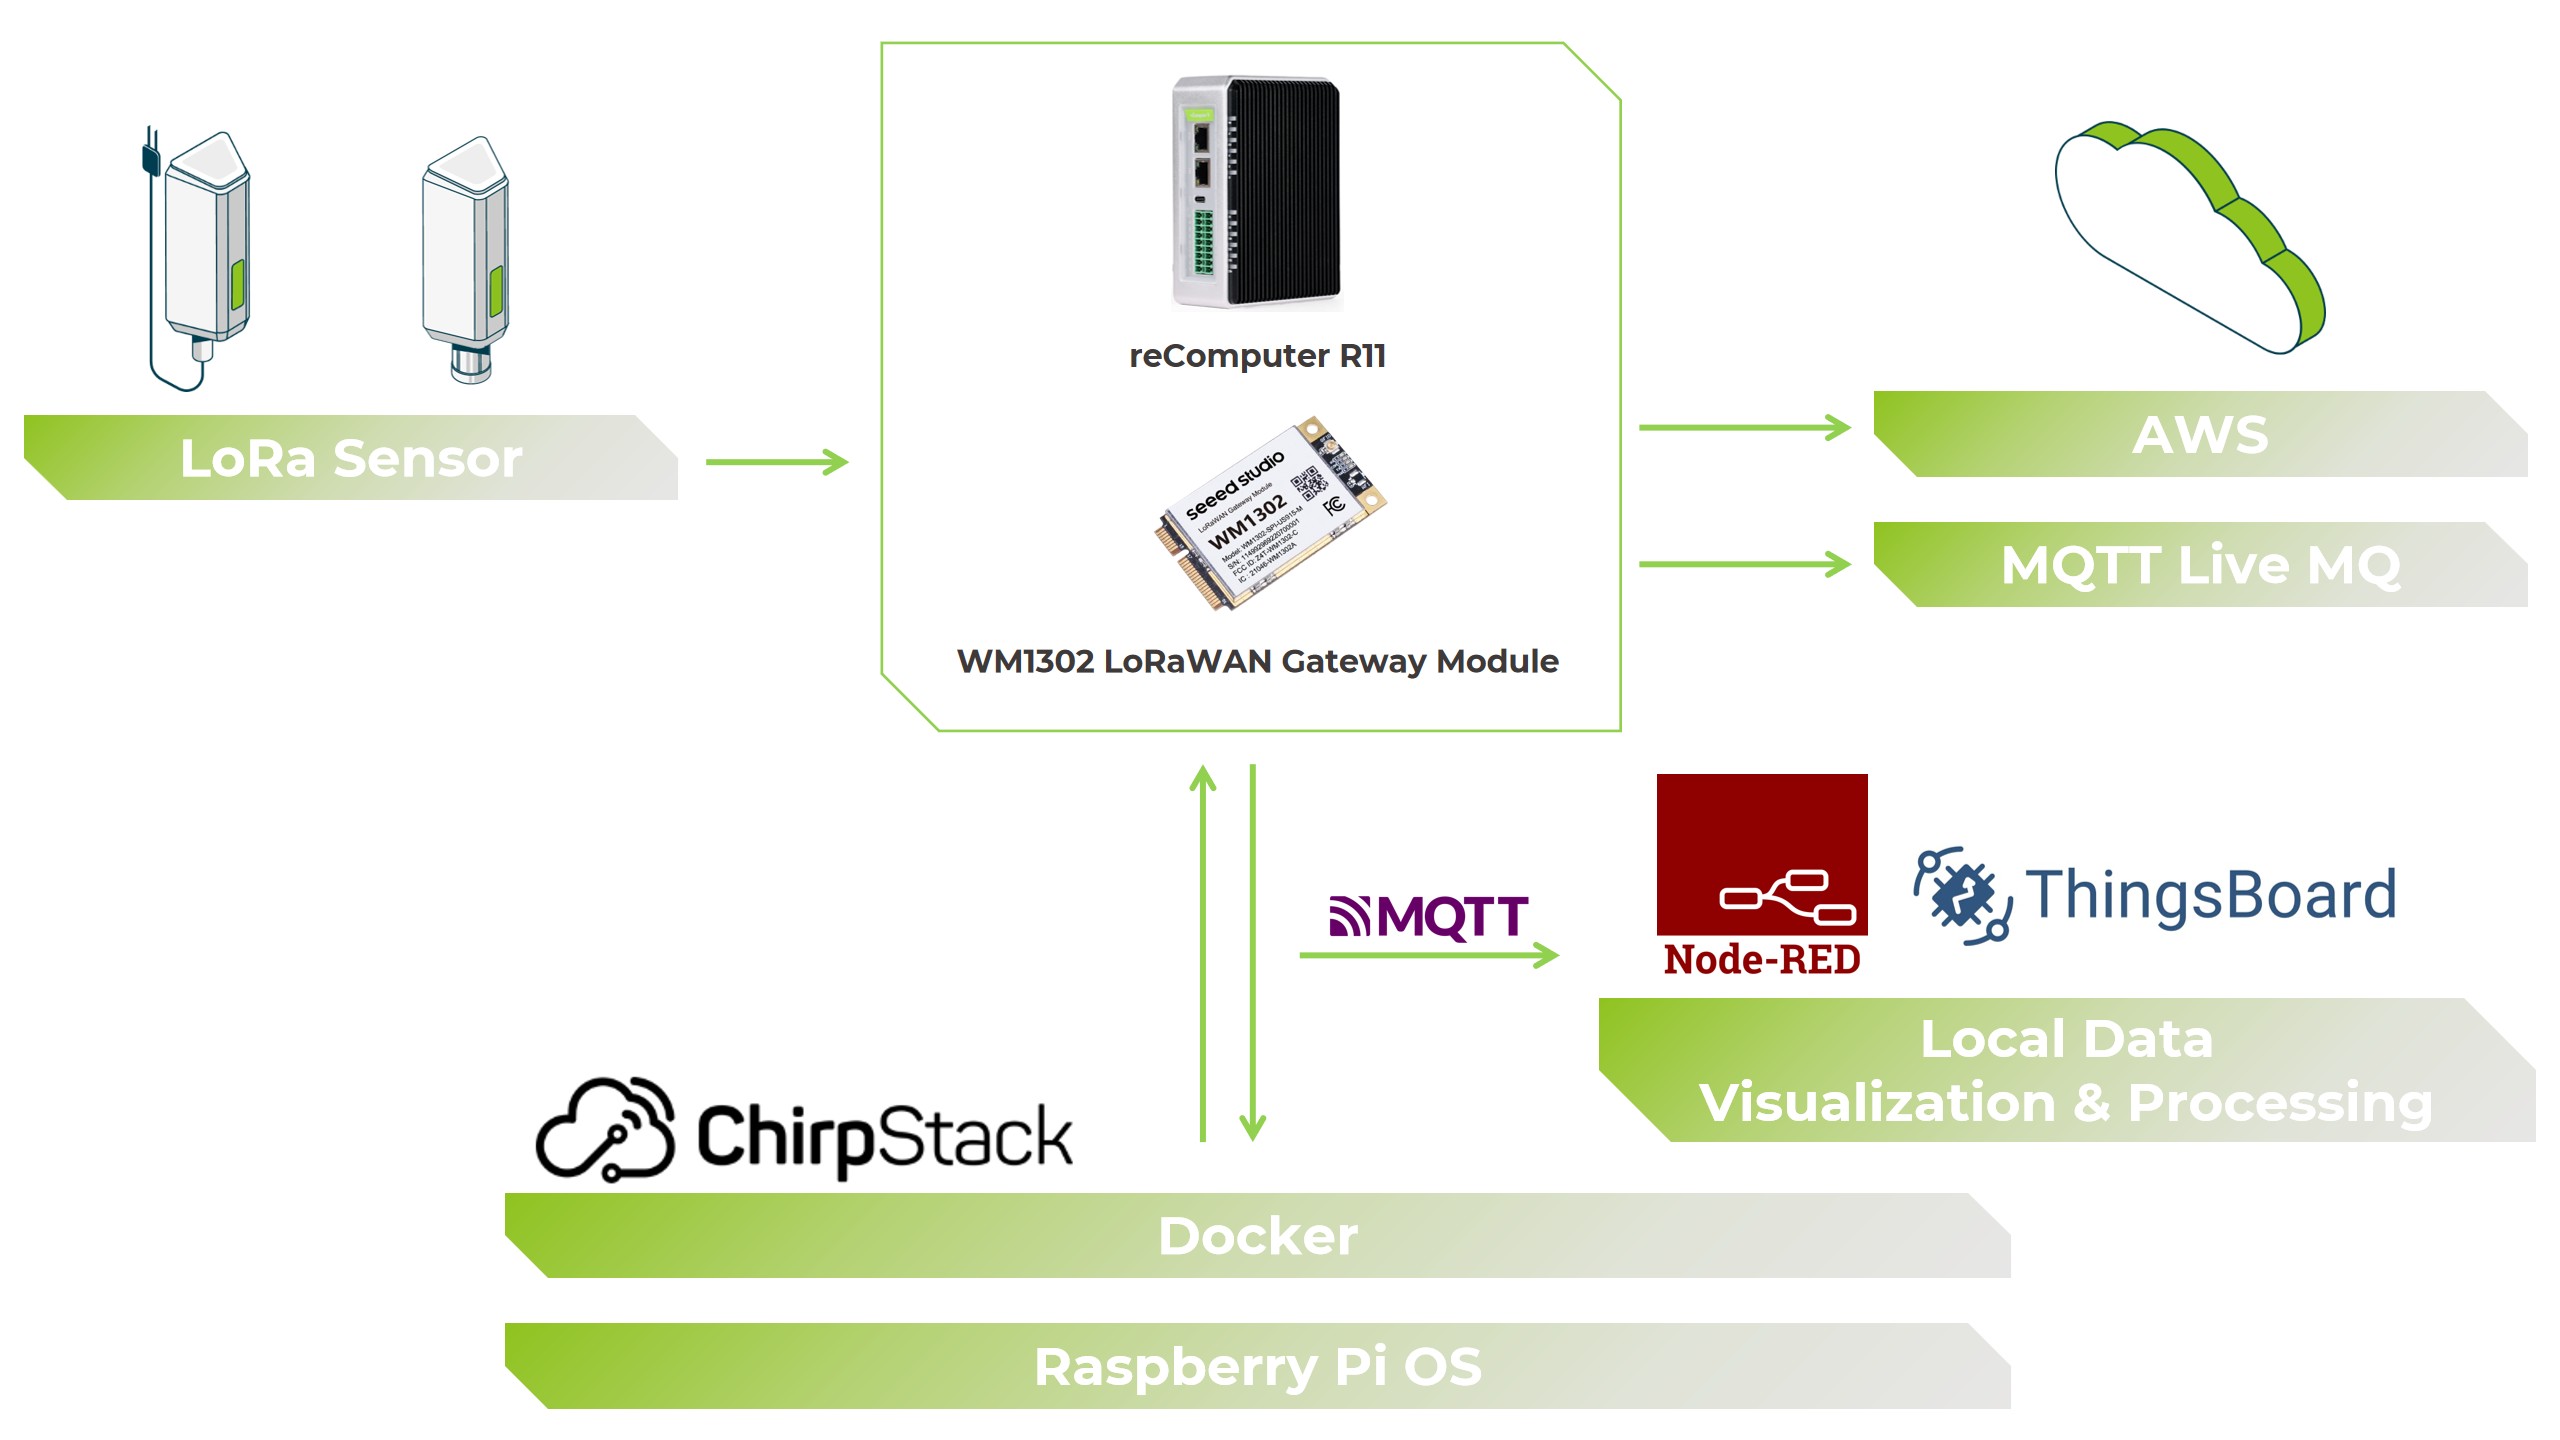
Required materials
- Seeed reComputer R1X
- WM1302 LoRaWAN gateway module
- SenseCAP S2101 Sensor
Docker installation
-
Update the system
 sudo apt update
 sudo apt upgrade
-
Install Docker
 curl -fsSL https://get.docker.com -o get-docker.sh
 sudo sh get-docker.sh
-
Add the user to the Docker group
sudo usermod -aG docker ${USER} -
Restart the system
sudo reboot
-
Check the installation
Docker Run Hello World
-
Install Docker Compose
sudo apt install docker-compose
Packet Forwarding Execution
The WM1302 module requires the Semtech Packet Forwarder to relay data between the LoRa module and ChirpStack. The reComputer R11 has a pre-configured installation guide. available on the official Seeed wiki.
1. Modify the configuration
Open the configuration file corresponding to your LoRa region (e.g., US915):
nano global_conf.json.sx1250.US915
Modify the gateway_conf section:
 {
 "gateway_conf": {
 "gateway_ID": "AA555A0000000000",
 "server_address": "localhost",
 "serv_port_up": 1700,
 "serv_port_down": 1700
 }}
Replace the gateway ID with your own and use the JSON file appropriate for your region.
2. Launch the Packet Forwarder
./lora_pkt_fwd -c global_conf.json.sx1250.US915
Start the gateway
Download the docker-compose.yml file from the reComputer page and adapt the frequency band to your configuration.
 chirpstack-gateway-bridge:
 image: chirpstack/chirpstack-gateway-bridge:4
 restart: unless stopped
 ports:
 - "1700:1700/udp"
 volumes:
- ./configuration/chirpstack-gateway-bridge:/etc/chirpstack-gateway-bridge
 environment:
 - INTEGRATION__MQTT__EVENT_TOPIC_TEMPLATE=us915_0/gateway/ {{ .GatewayID }} /event/ {{ .EventType }}
 - INTEGRATION__MQTT__STATE_TOPIC_TEMPLATE=us915_0/gateway/ {{ .GatewayID }} /state/ {{ .StateType }}
 - INTEGRATION__MQTT__COMMAND_TOPIC_TEMPLATE=us915_0/gateway/ {{ .GatewayID }} /command/#
 depends_on:
 - mosquitoto
Launch ChirpStack
sudo docker-compose up -d
Check the active containers:
sudo docker ps
Access to the ChirpStack interface
Go to http://localhost:8080
Default credentials:
User: admin
Password: admin
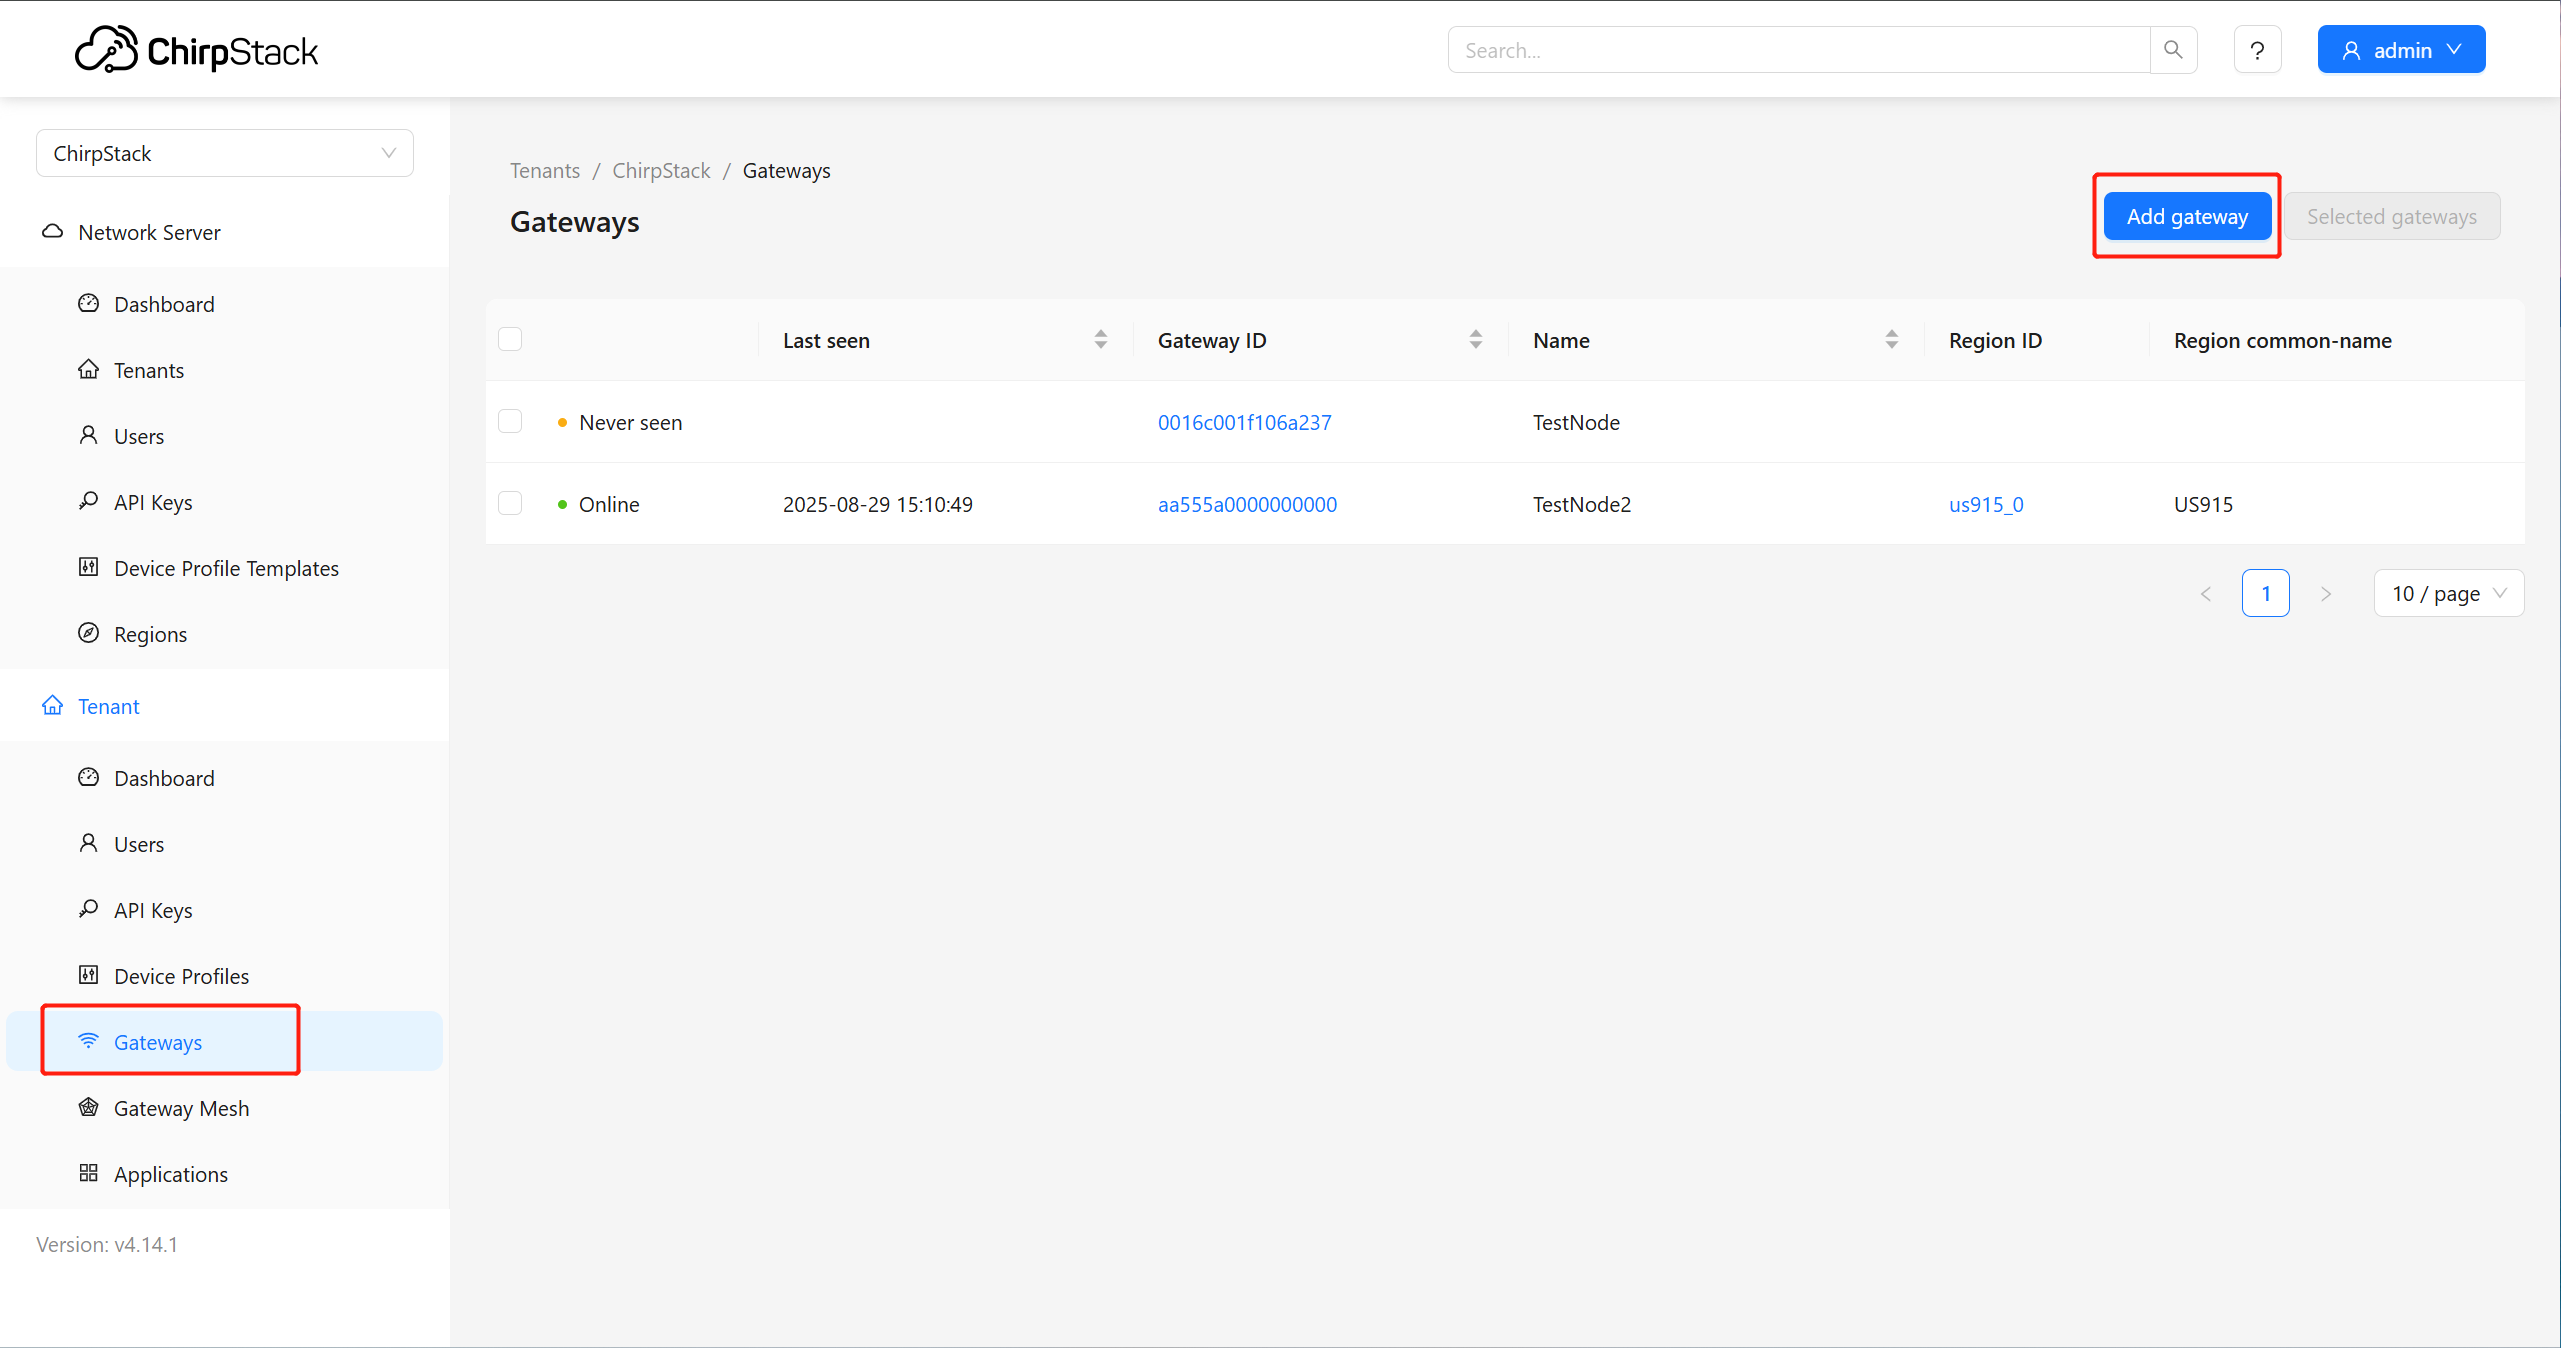
Adding the gateway
- In ChirpStack, go to Gateways → Create Gateway
- Please provide the following information:
- Gateway ID: AA555A0000000000
- Name: Descriptive name of the footbridge
Creating the device profile
- Go to Device Profiles → Create Device Profile
- Please provide the following information:
- Name: Your profile name
- Region: corresponding to your gateway (e.g., US915)
- In the Codec tab, select JavaScript Functions and paste your device's codec.
Adding a device
- Go to Tenant → Application → Add Application
- Give it a name, save, and then click Add Device
- Please provide the following information:
- Device EUI: from the sensor (e.g., SenseCAP S2101)
- Device Profile: the created profile
- Application Key: Device key

Device status check
In the device's Events tab, you will see the junction packets and uplink frames. You can view data such as temperature and humidity sent by the SenseCAP S2101.
MQTT Integration
ChirpStack uses MQTT to stream data to your applications or dashboards.
Configure your MQTT client (e.g., MQTT Explorer):
- Host: IP address of reComputer R11
- Port: 1883
Example topic:
application/c853ffcd-53f0-4de3-83b9-5467ff895f76/device/2cf7f1c043500402/event/up
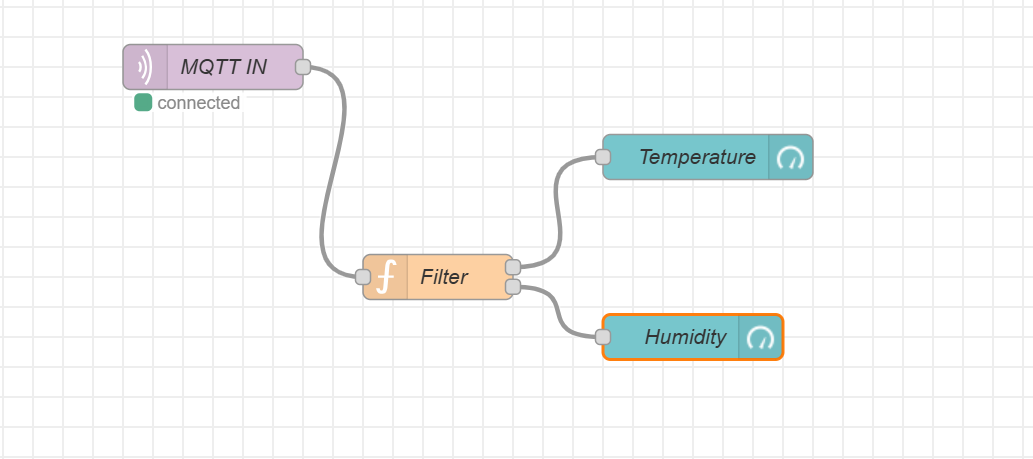
Node-RED Integration
Visualize LoRaWAN data with Node-RED via MQTT nodes and custom functions.
 // Example of a Node-RED function to extract temperature and humidity
 let data = msg.payload;
 if (typeof data === "string") {
 try { data = JSON.parse(data); } catch (e) { return [null,null]; }
 }
if (!data.object || !Array.isArray(data.object.messages)) return [null,null];
 let tempMsg=null, humMsg=null;
 data.object.messages.forEach(m=>{
 if(m.type==="report_telemetry"){
 if(m.measurementId===4097) tempMsg={topic:"temperature",payload:m.measurementValue};
 else if(m.measurementId===4098) humMsg={topic:"humidity",payload:m.measurementValue};
 }
 });
 return [tempMsg, humMsg];
Connect the outputs to Gauge or visualization nodes to display the measurements.
Technical support and discussion
Thank you for choosing our products! We offer several support channels to ensure a Seamless experience: documentation, technical forums and direct support.